
How to Relight a Photo 3 Ways to Change Its Lighting
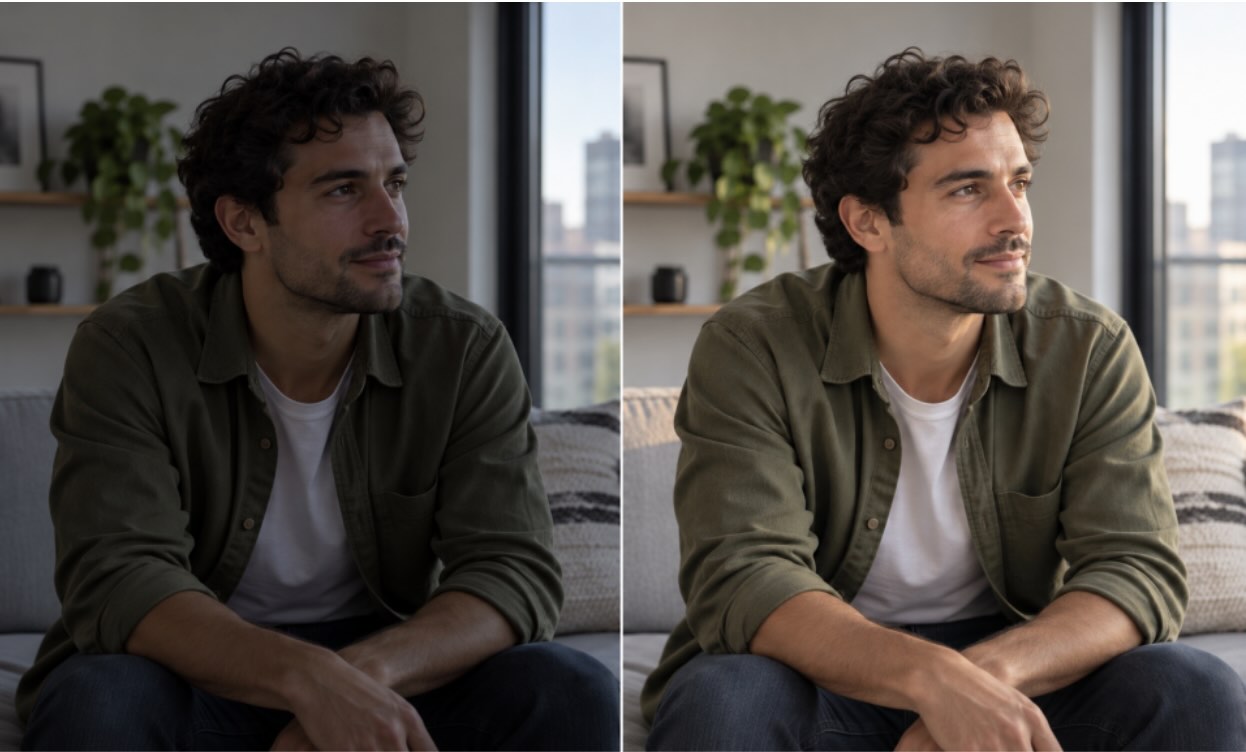
The same portrait before and after a soft, directional relight.
A portrait can be correctly framed and still feel flat when overhead light casts hard shadows or a bright window leaves the face underexposed. A basic exposure slider only changes overall tones; relighting tools can add or reshape the apparent light source. The AI Relight Photo Editor from AirBrush offers preset effects, while AirBrush also provides a broader editing workflow. Below are three dedicated AI relighting options, with different levels of control and device requirements.
The goal is not to make every part of a photo equally bright. A convincing relight gives the subject enough separation while keeping the original setting believable. Before choosing a tool, look at where the existing shadows fall, whether the background is already bright, and what the image is for: a profile portrait may need gentle facial fill, while a night-time street image may look more natural with its darker mood intact.
At a Glance
| Method | Best for | Lighting control | Cost / access |
|---|---|---|---|
| AirBrush Relight | Portrait mood and quick presets | Choose a Relight effect | Free effects; Plus styles |
| Fotor Relight | One-tap automated relighting | Auto-enhance, then refine | Free tool; limits may vary |
| Luminar Light Depth | Depth-aware lighting and local control | Place and shape light; adjust near/far | US$99 one-time desktop license |
1. Relight the Photo with AirBrush
Choose this method when the image needs a different lighting character, not just a brighter overall exposure. AirBrush lists seven free Relight effects—Soft Flash, Flashnight, Flash, G7X, DigiCam, Even Light, and DeGlare. The Relighter page also marks Sunsoft and Tan Flash as advanced Plus styles. The presets offer distinct starting points: Even Light can suit a more balanced look, while flash-inspired options create a stronger camera-flash mood.
Step by step
- Open the AirBrush Relighter page and upload the photo you want to edit.
- Browse the available Relight effects. Start with one that matches the existing scene; for a subtle correction, compare Even Light with a stronger effect rather than assuming the brightest option will look best.
- Select an effect and review how it changes the subject and background. If you want an advanced Plus style, use the editor or app route indicated by the page; paid styles may require a Plus membership.
- Apply the chosen effect, inspect facial details, skin tone, hair edges, and the direction of shadows, then download the result if it looks natural.
AirBrush says Relight is designed to maintain recognizable features, colors, and textures, but that is not a guarantee that every edit will fit every image. A small, careful preview check matters most around hair, glasses, and the boundary between a person and a bright background.
Platform and pricing: AirBrush’s web pricing page lists a Free plan at US$0, including three credits on first login and limited feature access. Web Plus costs US$15.95 per month, billed monthly, or US$95.95 per year, billed yearly; both include 80 AI credits each month. Several Relight effects are free, while advanced Plus styles are paid. Prices checked October 30, 2026; regional or app-store terms may differ.
2. Try One-Tap Relighting in Fotor
Fotor offers a dedicated Relight Image tool rather than only a general photo-adjustment panel. Its official page describes an automatic one-tap relight, followed by optional refinements using the editor’s other tools. This is a straightforward option when you want the service to make an initial lighting change before you decide whether more editing is needed.
Step by step
- Open Fotor’s Relight Photo page and select Relight Image Now, then upload or drag and drop your photo.
- Choose 1-Tap Enhance from the left sidebar to apply Fotor’s automatic relighting.
- If needed, refine the result with the built-in editing tools in the left sidebar, such as brightness or contrast.
- Preview the edited image and use Download to save it. Check the subject and background together before keeping the result.
Fotor calls the Relight tool free on its feature page. Its pricing page lists Basic as Free forever (US$0) with limited free credits, but does not expose a fixed paid-plan amount in the public page text. Confirm any current usage, credit, or export limits in the live account and checkout flow before processing a large batch.
3. Shape the Light in Luminar
Luminar’s Light Depth tool uses depth mapping to add dimensional light and shadow, with controls for the light’s position, size, softness, warmth, and near/far brightness. Skylum says Light Depth has replaced its earlier Relight AI tool, while existing Relight AI edits remain adjustable. It is the most hands-on option here, suited to users who want to shape a portrait’s lighting rather than apply a single preset.
Step by step
- Open the photo in Luminar and switch to the Edit workspace, then open Light Depth from the creative tools.
- Raise Amount to activate the effect. Use the on-screen handles to position and size the main light, then adjust its wrap and softness.
- Tune Brightness Near and Brightness Far separately to balance the subject and background; adjust Warmth and the near/far warmth controls to match the scene.
- Compare the result with the original and reduce Amount or move the light if facial highlights, shadows, or edges look artificial. Save or export when the lighting feels consistent.
Platform and pricing: Skylum’s official pricing page lists the Luminar desktop lifetime license at US$99 as of October 30, 2026 (the page showed a US$417 reference price before discount). Light Depth is included among the editing tools; the price is for the desktop license, not a standalone relighting feature. Promotions and renewal terms for selected AI services can change, so confirm the checkout total before buying.
Frequently Asked Questions
Is relighting the same as increasing brightness?
No. Brightness or exposure adjustments mainly change tonal levels. A relighting effect aims to change the lighting style or mood of the image, so it may affect highlights and shadows differently. Use a simple exposure correction when that is all the photo needs.
What is the difference between Fotor Relight and Luminar Light Depth?
Fotor applies an automatic one-tap relight in a browser-based editor, followed by optional adjustments. Luminar Light Depth gives more direct control over the light’s placement, softness, warmth, and foreground/background balance, but requires a paid desktop license.
Which AirBrush Relight effects are free?
The AirBrush Relighter page currently lists Soft Flash, Flashnight, Flash, G7X, DigiCam, Even Light, and DeGlare as seven free effects. Sunsoft and Tan Flash are shown as advanced Plus styles. Availability may vary by platform or account.
How much does AirBrush cost?
As checked on October 30, 2026, AirBrush Web Plus is listed at US$15.95 per month or US$95.95 per year. A Free plan is also listed at US$0. These are web prices; confirm the current total and terms on the checkout page for your region.
Final Thoughts
These tools now address the same core problem in three different ways: AirBrush offers ready-made lighting styles, Fotor provides a free one-tap starting point, and Luminar gives more hands-on control over light placement and depth. The right choice depends on whether speed, a browser-based free option, or detailed desktop adjustments matter most. Start with a subtle change, compare it with the unedited image, and inspect the face, shadow edges, and background at full size before sharing.
